


Floral prints have been used in clothes, bedsheets and other things since time immemorial can never go out of fashion. They are not gender specific and can be found on males shirts and female’s skirts. So, loved by all, how could they be left behind when one talks about nail art.
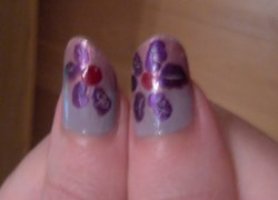
Yes, floral prints have made their way to nail arts and have been a favorite among the nail art lovers. Floral nail art print are very easy to make and can be created easily at home. When you’ll see the design in the above picture, you’ll say, Oh My God! they might be very tough to make, but when you read the process of creating it, you’ll find out they are actually not that tough like they seem to be. Read on and learn the easiest way to have these printed on your nails:
Complexity Level: Easy
Time required: It requires just half an hour to make this nail art. The time which will be required will be basically for the nails to get dry.
Estimated cost: Very low. You can use your old nail paints available in your home and you don’t need to buy anything for this nail art.
Resources required
1. Base coat (transparent)
2. Nail paints of two different colors of your choice
3. A top coat
5. A toothpick
Instructions
Step 1: Applying the base coat: First of all wash your hands with luke warm water and pat them dry. Then polish your nails with the transparent base coat. Let it dry.
Step 2: Applying colored nailpaint: After the basecoat is dried, apply any light color nail paint on your nails. Then leave it to dry.
Step 3: Making flowers: Now, when the nail paint gets dry, it’s time to make the flowers. Just pick the other color among the two, put five small dots making a circle on your nail. The dots needn’t be of equal shape and size.
Step 4: Giving shape to flowers: Now, as soon as you put the dots, take the toothpick, put its point in the middle of the dot and drag it to the center. Repeat this with all the dots. And the flower is there. Repeat this process on all the nails. You can make one or two flowers on each nail, depending on your choice.
Step 5: Applying top coat: Now, after the above process is done and the nails get completely dry, apply a top coat. It should be as thin as possible. It will give a shine and a finishing touch to your nails. That’s it, your’re done with the beautiful floral prints.
Frequently asked questions
Which color combination is best for this nail art?
Always chose light colors for the base and dark for the flowers. The flowers will emerge clear and beautiful if you will use light color as the base color. Pink color base and black flowers make a lovely combination. Similarly, white color base and green colored flowers is also a great combination
Is it necessary to use a toothpick? What is a substitute to toothpick?
Well, if you don’t have a toothpick, you can use a matchstick, nib of an old and useless pen or pencil. Make sure you use any pointed object to create the flowers.
What if the topcoat is thick?
You can always use a thinner to make your nail paint thin.
Does it require any special skill?
No, it doesn’t. It’s very simple to make. Even a first timer can do it.
Quick tips
1. Be careful while applying the top coat as if it is thick, it will ruin your nail art.
2. If your base nail paint has gone thick, then add thinner to it.
3. Always buy good quality of nail paints, as cheap and low quality paints can harm your nails.
4. Never pick dark colors for both the base coat and the flowers. It won’t make the flowers look prominent. To make them look prominent, the base color should be light and the flowers should be dark or vice versa.