

This festive season pep up your nails with exciting Christmas themes. Are you falling short of ideas? Here are some stunning nail art themes, to dazzle for your Christmas party.
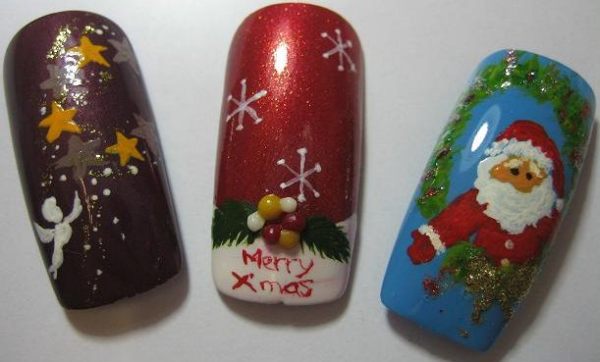
1. Santa Claus

Santa Claus nail art is one of the most popular nail art themes during the Christmas season. The fact that there is great scope for using all the Christmas colors like red, green, gold, silver and blue on this design makes it much more popular and stunning.
DIY
1. For the Santa Claus nail art, first use blue or even clear nail color as the base coat. You may try a basic sky blue or a sparkly blue color of your choice.
2. Use beige, pink or flesh nail color for drawing the face. Put a circle in the middle of the nail for the face. White can be used for the beard and red to paint the coat and the hat.
3. You can now put two dots in black for the eyes. Remember that you need to have steady hands for drawing the details and may not get it right in the first attempt.
4. Add little details like buttons, fur, snowflakes, Xmas hangings, etc. in glitter colors depending on your creativity.
2. Snowman

Equally popular are the snowman designs which look absolutely stunning even if they are made with basic color combinations like black/white, blue/white etc. along with the sparing use of glitters to add glamor to the theme.
DIY
1. Give a base coat in your preferred nail color choice like black or blue with sparkles added.
2. Take a white nail color and add three circles in the center or a little towards the side of your nail.
3. The top circle is the face and the other two has to be in gradually increasing sizes to represent the body. Add details like eyes, buttons, twig, hat, etc. with black nail color.
4. You can add snowflakes on the base color or add glitters of crystals to add more sparkle to your theme.
3. Snowflakes

Snowflakes nail art can look magnificent against a black or a deep blue base color and depending on what you add on your nails like crystals and glitters, it can look extremely sophisticated and beautiful on your nails. Remember that this design can get very busy if you overdo it. So stick to a single big snowflake or a couple of smaller ones to keep it simple.
DIY
1. Paint your nails in black or deep sparkly blue. You can add the sparkles later on as well.
2. Now using white nail color, draw snowflakes as per your design. Do not go for elaborate snowflake designs if you are a starter. Wait for the design to dry and apply the glitter coat over it.
3. You can now add crystals over it to create the ultimate snowflake design.
4. You may also experiment by adding small white dots all over the nails instead to crystals to use your own imagination.
4. Embellished

Whatever style of nail art you choose, adding embellishments on your nail like rings, glitters, crystals, rhinestones, etc. will immediately make them look exclusive and chic.
DIY
1. Embellishments can be added to any nail art that you create. They look particularly beautiful along with basic colors like black, white and blue.
2. Embellishments in patterns like Christmas tree nail art, snowflakes nail art and snowman nail art can increase their overall appeal.
3. All you need to do is fix the embellishments after you have done the nail art.
4. There is no dearth of nail art designs that you can create with embellishments. Try your own unique styles to create varying effects.
Exclusive nail art themes with varied detailing can add that extra dose of glamour to your Christmas party look. A simple tip to a fab nail art theme would be to do the detailing on one nail and leave the rest with plain sparky shades.