


Beautiful hands tell a lot about you. Believe it or not but your personal grooming and care is reflected through it. How many of us think of giving our hands a final touch up every time we walk out of our doors? Those who do are the beaters! We often tend to overlook our hands and spend a lot of time polishing our faces. The realization comes when the girl next to us flaunts a stunning nail art and all we can do is crib about our chipped version. When you talk about beautiful hands, nails dominate the scene. And talking about nails, the role of nail polishes canât be overlooked. Special mention goes to the âcrackledâ bunch, which has been a rage ever since it hit the market.
Crackled nail polishes give a flirty yet fun effect to your nail art design. The monotony of a single tone is broken by textured splashes of crackled nail polishes. You do not need to go to the salon to get it done. The comfort can be brought home from one of the shelves of a cosmetic store. While there are many well known brands for these nail polishes, Covergirl, OPI, China Glaze, Barry M, and Sally Hansen are considered to be the best out of rest.
It is very important to apply them correctly. Wrong procedure can spoil the whole look. Before we bring to you some of the best shades, let us describe the applying procedure.
Step 1
Apply your favorite nail polish as a base coat (preferably two coats). Allow it to dry completely. If the base coat is wet you wonât get the desired effect. If you want your nail polish to dry quickly, go for some matte shade as they dry much quickly. Take care of the contrast between your base paint and the crackle shade. Avoid using single hue.
Step 2
After your base coat layers are completely dry, apply the crackle overcoat. If you want more cracks, apply a thin layer and if you like it with lesser cracks, apply a thick coat. Initially, very few cracks will appear but as the nail polish dries, more cracks will begin to appear. Allow it to dry completely too. If you are a beginner, you may not get desired results at first. In such a case donât hesitate to remove it and try it again. Remember, perfection needs undying attempts.
Step 3
After the overcoat has dried completely and you are satisfied with the look, apply a top coat of nail polish enhancer (like Hard As Nails by Sally Hansen). It adds extra shine to your pattern and brings out a better contrast between the base coat and the crackle nail polish while ensuring it doesnât chip off easily.
Keep in mind that the base and the crackle color should contrast well. Allow the base coat to dry completely, the longer you wait, the better it gets. Also, the number of cracks you want depends on whether you are applying a thin or a thick coat.
1. Sally Hansen Antiqued Gold
BRAND : Sally Hansen
PRICE : USD 7
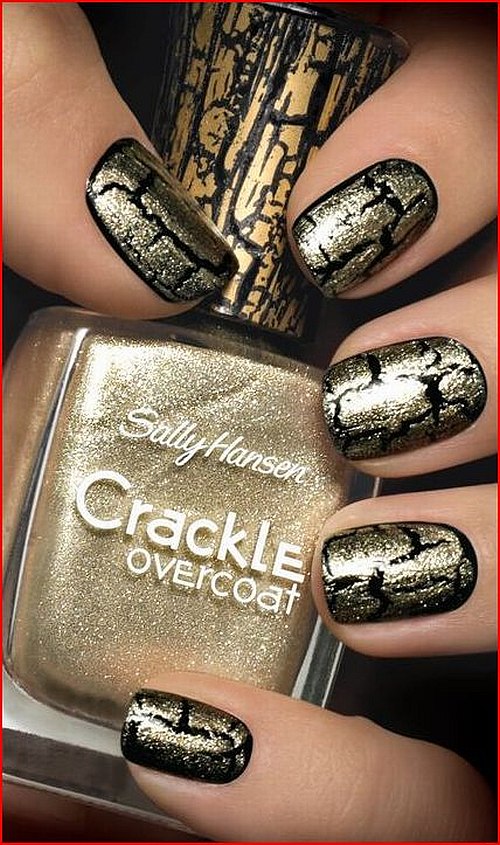
Antiqued gold is one of the most stunning colors you will find. It works best when combined with a darker color as base, such as black. The color pops out really well. If you want a softer look, pair it up with a softer shade like turquoise.
USP
For the party animals, this shade brings out the best of their wild statements.
PROS
Teamed with black, it looks stunning and flamboyant.
A unique design is created on each nail.
2. Sally Hansen Vintage Violet
BRAND : Sally Hansen
PRICE : USD 7

This is a gorgeous crackle and after drying it gives a beautiful shimmering violet cover. If you are not satisfied with the bling and want more of it, try pairing it up with a silver base coat. The bluish purple shade will never let your shining instincts down.
USP
If you always wanted a shimmering crackle shade, this is the nail polish to go for. Most brands have unsuccessfully launched shimmer crackles, but Sally Hansen works best.
PROS
This shade is easy to apply and cracks really well.
3. Sally Hansen Distressed Denim
BRAND : Sally Hansen
PRICE : USD 7
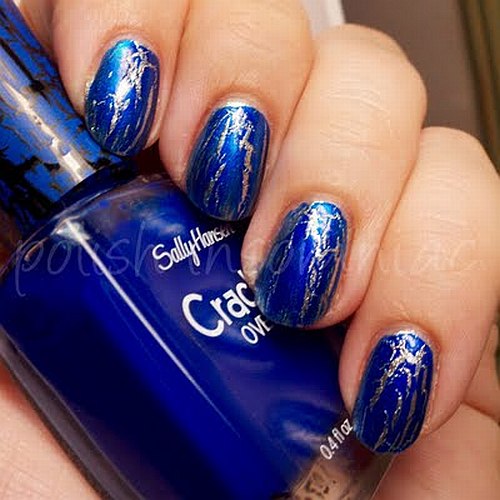
Distressed Denim flashes a striking indigo blue shade. To give off a tropical look, pair it up with a green base coat. Otherwise, black is a perfect and universal base color that can make any nail color look stunning. You can also try teaming it with orange for a funky style.
USP
This shade gives a very mysterious appeal to your nails. The blue tone looks mesmerizing.
PROS
It just takes 60 seconds to get set from wet.
The tone of blue looks amazing.
4. Sally Hansen Fuchsia Shock
BRAND : Sally Hansen
PRICE : USD 7
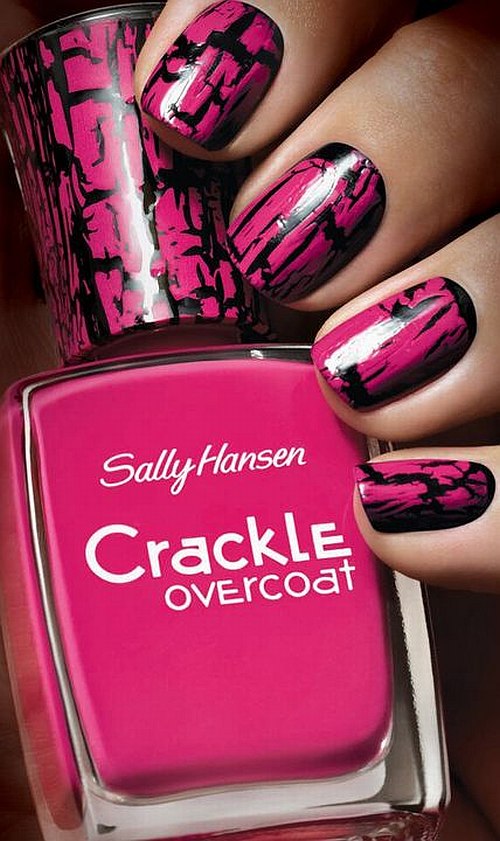
Here comes a color, which speaks the language of feminism. The fuchsia shade looks flamboyant and will work best on your nails if you are a punk star. If you hate metallic crackle colors and love bright color combos like that of the 80âs, wear it over a base coat of yellow.
USP
For those girls who love punk, this shade is a super star!
PROS
Wearing a fuchsia shade you will look no less than a doll who can make heads turn.
It takes 60 seconds to get set from wet.
5. Sally Hansen Snow Blast
BRAND : Sally Hansen
PRICE : USD 7
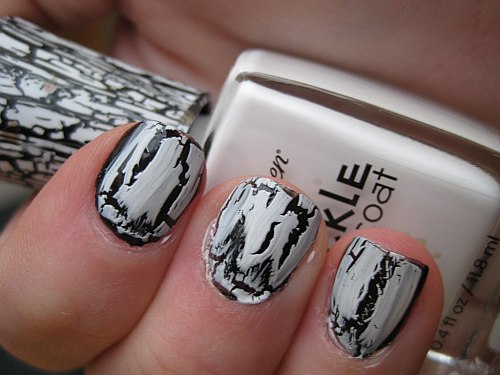
As the name suggests, this crackle hue is white. Although white is a color, which goes well with almost any shade, it is best to use it against a dark shade base coat. Try matching it with red or deep blue for stark combinations.
USP
White color reflects serenity. Someday if you feel like walking the lanes as a goddess of peace, be sure to flaunt it with your white robe.
PROS
The nail polish is a quick drying one.
The cracks that form look very good and appealing.
6. Sally Hansen Cherry Smash
BRAND : Sally Hansen
PRICE : USD 7
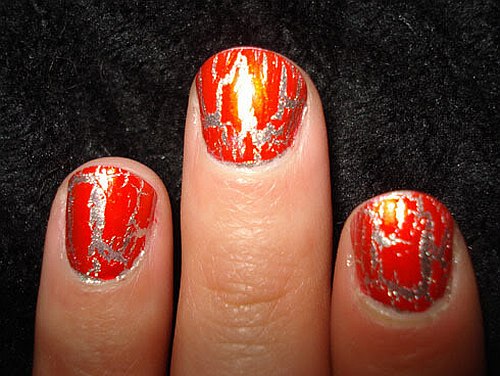
Cherry smash is a color, which looks gorgeous. Cherry has always been known to depict lusciousness and seduction. With a base coat of black nail polish, this color looks the best.
USP
Sally knows what it takes to become a sex goddess; and hence its hue is the strongest point.
PROS
Every nail gets a unique design as the color cracks differently.
7. Sally Hansen Fractured Foil
BRAND : Sally Hansen
PRICE : USD 7
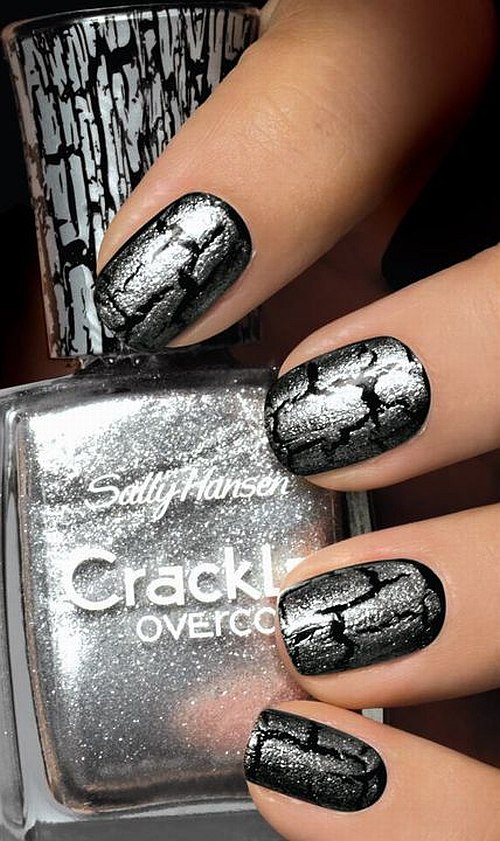
Fractured foil is a shimmering baby in the lot. Exuding silverfish glitter, it looks best when teamed with black. That way, the best of it comes out. You can also try it with a blue basecoat.
USP
This gives a shimmering effect that dazzles in the dark.
PROS
The look is pretty neat and the application is not difficult, either.